
We've talked about donuts here and there on Homemade Recipes and today, we've got a special kind of donut to discuss. Bombolonis, or an Italian filled donut.
Some say this Italian pastry was named due to its resemblance to a bomb or a grenade, while others say that it's because of the high amount of calories of the recipe. We, on the other hand, like to call calories “delicious points” and this Italian pastry is delicious in more ways than one, especially when you take that first bite!
RELATED: How to Make Mouthwatering Mini Cinnamon Sugar Donuts
You Say Bomboloni, I Say Delicious
Ingredients:
- 1 cup of whole milk, lukewarm
- 3 tablespoons of sugar
- 2 teaspoons of dry active yeast
- 4 tablespoons of butter, melted
- 2 tablespoons of oil
- 1 teaspoon of vanilla extract
- 4 cups of all-purpose flour
- 1/2 teaspoon of salt
Step 1: Add the Yeast to the Milk
Heat up the milk on the stove or in the microwave. It should be about “blood temperature”, which is around 98°F and warm yet safe to the touch.
This is important because if you add the yeast to milk that has been overheated, you run the risk of killing your yeast and having to start over from scratch. Afterward, add in the sugar and yeast and whisk until everything is dissolved and set aside for 10-15 minutes to bloom.
Note: Also, if your yeast doesn't “bloom” and turn foamy within 10-15 minutes, it's probably dead and you should replace it with new yeast.
Step 2: Make the Dough
While your yeast mixture is blooming, let's get started on the rest of the dough. In a large mixing bowl, mix together the eggs, melted butter, cooking oil, and vanilla extract. Whisk until everything is combined thoroughly.
Step 3: Add the Flour and Salt
Next, if you have a stand mixer, bring it out and use the dough hook attachment to combine your ingredients into a dough. If you don't happen to have one, no worries, you can totally mix your dough using a wooden spoon.
Slowly add in your flour and salt and mix together until it starts to come together as a loose dough. At this point, retrieve your yeast-milk mixture and add it to the dough and mix until everything is well combined.
Step 4: Roll and Knead the Dough
At this point, roll your dough out onto a floured work surface and knead for about 5 minutes. Your goal here is to completely meld all your ingredients together in a cohesive dough but be careful to not overwork the dough.
If your dough is still sticky after kneading, you can add a little extra flour.
Step 5: Cover with a Kitchen Towel to Rest
Once your dough is kneaded adequately, you can poke it and it should lightly spring back, place it in an oiled bowl and cover with plastic or cover with a kitchen towel. Keep it at room temperature. Let the dough rise for an hour or until the dough has doubled in size.
RELATED: Homemade Krispy Kreme Donuts Recipe
Step 6: Roll Dough Out and Cut Circles
After your dough has properly risen, punch the air out and once again, place it on a floured work surface. Using a rolling pin or a wine bottle, roll out the dough to about 1/2 inch thickness.
Next, cut out as many 3″ circles as you can and repeat the process until you have used all the excess dough. If you don't have a 3″ inch cookie cutter, an old fashioned glass works just fine.
Step 7: Allow Them to Proof
After you've cut out as many donuts as you can from your dough, place them on a lightly floured sheet pan and cover with a kitchen towel to proof. Allow them to proof for at least 40-60 minutes at room temperature.
This is an important step for this Italian pastry, as it will give the dough that necessary volume that will be helpful when it comes time to stuff them with your filling.
Step 8: Start Frying!
After your donuts are done proofing, you can tell they're done once they've doubled in size and are soft and airy to the touch, we can begin frying.
Heat up a neutral, high smoke point oil such as canola or corn oil, in a deep pot that will allow the donuts to float and not touch the bottom of the pan. If you have a deep-fry thermometer, heat your oil on medium heat to a temperature of 360-375°F.
Make sure to fry your donuts in batches of only 2-3 at a time as to not drastically drop the temperature of the oil. This will result in soggy, greasy donuts. Likewise, if your donuts are browning too quickly, lower your heat.
Step 9: Coat With Sugar
Fry off the donuts, flipping once, to achieve a golden brown exterior on both sides. Once done, drain on a plate with paper towels or a cooling rack for 2-3 minutes to drain excess oil. While still warm, lightly coat the donuts in white granulated sugar and allow to fully cool before moving on to the next step.
Step 10: Fill With Nutella
Once the donuts have cooled fully, using a chopstick or a paring knife, poke a hole in one side of the donut and slide it around to create space for the filling. Be careful as to not poke through the other side of the donut.
Using a pastry bag or a Ziploc bag, fill the donuts with Nutella and carefully fill your donuts until the filling starts to push back. Best consumed immediately, which shouldn't be a problem at all!
See how to make Nutella Bomboloni in this video by Savor Easy:
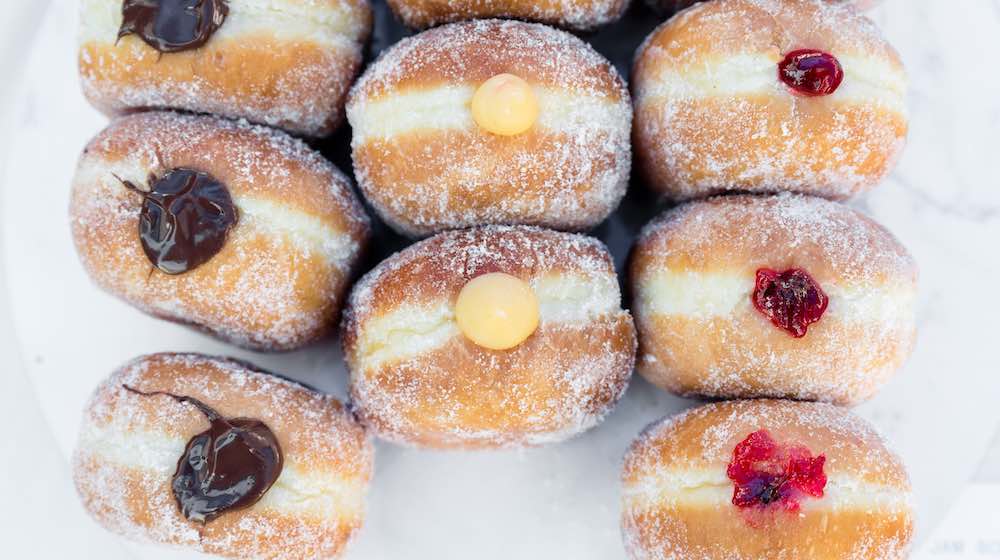
And there you have it, the luscious Italian pastry known as the Bomboloni. Now that you have the technique down for cream filled donuts, you can play around and experiment with different fillings.
If Nutella isn't your cup of tea, you can totally fill your Italian donuts with homemade fruit jams, custards, or anything else your mind can think of.
What are some of your favorite donut recipes or variations? Try the recipe above? Tell us in the comment section below!
Up Next:
- 14 Life- Changing Homemade Jelly Donut Recipes
- Sushi Donuts Exist And They’re Absolutely Amazing | HMR
- 150 Quick and Easy Chicken Recipes | Homemade Recipes
Don’t forget to keep in touch, foodies! You can also WRITE FOR US and share your delectable recipes!
Also, make sure to follow us on Facebook, Instagram, Pinterest, and Twitter!