
If you own an instant pot, you know the things that you can achieve with that magical piece of kitchen equipment. From making fresh yogurt, sweet and salty kettle corn, perfectly cooked hard-boiled eggs, and even cheesecake.
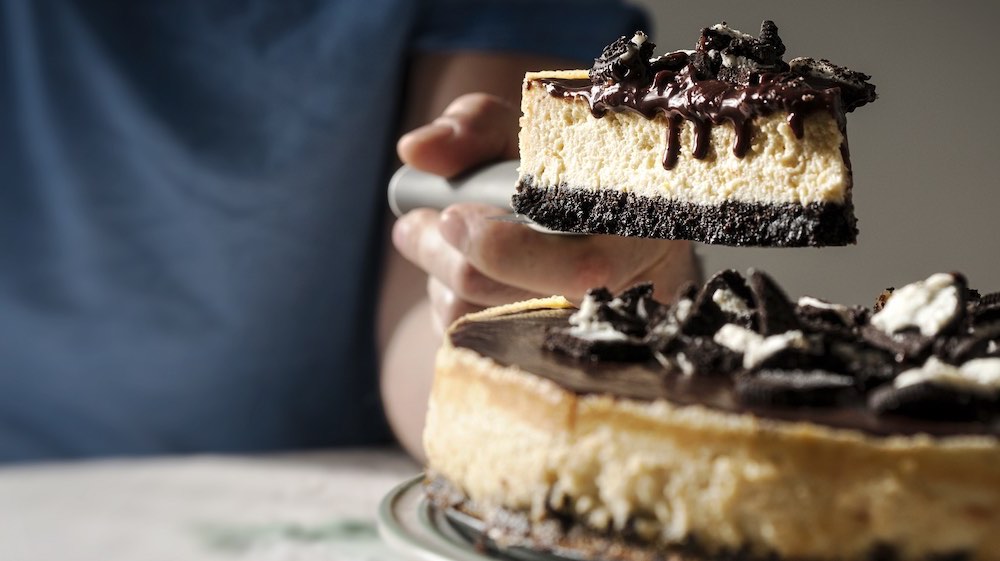
You heard us right, cheesecake! Pull out that instant pot and we'll show you how effortless it is to make instant pot oreo cheesecake with this delicious recipe.
RELATED: Quick And Easy Instant Pot Bread
Instant Pot, It's Not Just a One Trick Pony
Ingredients:
Crust
- 15 oreo cookies
- 3 tablespoons of melted butter
Cheesecake Batter
- 2 8-oz packages of cream cheese, room temperature
- 1/2 cup of white granulated sugar
- 1 tablespoon of cornstarch
- 3 large eggs, room temperature
- 1/2 cup of heavy cream, room temperature
- 1 teaspoon of vanilla extract
- 10 oreo cookies, chopped
White Chocolate Ganache, optional
- 1/3 cup of heavy whipping cream
- 1 cup of white chocolate chips
Garnish
- 8 oreo cookies, chopped
Step 1: Process the Oreo Cookies
Before we work on the crust for our oreo cheesecake, spray a 7 x 3-inch springform pan with nonstick spray. Process your oreo cookies in a food processor or add them to a ziplock bag and crush them using a frying pan or a rolling pin.
Once done, combine them with the melted butter and stir until everything is well incorporated.
Step 2: Prepare the Crust
Press the cookie crumb and butter mixture into your greased springform pan. Using a mug or a measuring cup, do your best to push the crust mixture outwards to evenly line the edge of the pan. Refrigerate this for at least 30 minutes.
Step 3: Start Making the Batter
Now that our crust is made and chilling in the fridge, let's move onto our batter for the cheesecake. Before this step, make sure that your cream cheese, eggs, and heavy cream are all at room temperature before moving forward.
In a stand mixer or using a hand mixer with a large bowl, beat together the cream cheese, cornstarch and sugar until light and fluffy on low or medium speed.
Step 4: Add the Heavy Cream
Lower your mixer's speed to low and slowly add in the heavy cream. Make sure to occasionally scrape down the sides of the bowl to make sure everything is incorporated into the batter. Add in the vanilla extract and eggs, one at a time, until everything is well mixed.
Step 5: Pour the Batter
Add the chopped oreo cookies to the batter and remove the crust from the refrigerator. Slowly and evenly pour in your cheesecake batter into the pan.
Step 6: Prepare the Instant Pot Cooker
Position a trivet inside your instant pot and add 1 1/2 cups of water to the cooker. Wrap the top of your pan with foil before placing it into the cooker. Choose the manual setting on your instant pot cooker and set the pressure to high. Cooking times, however, will depend on the pan size you're using, elevation, and other factors.
- For a 7 x 3-inch springform pan, cook your cheesecake for 30 minutes.
- If you're using a 6-inch pan, cook your cheesecake for 35 minutes.
Based on a 7 x 3-inch pan, other factors may affect your cooking time, such as elevation but 30 minutes is a safe bet. If you want a creamier texture, stick to 30 minutes but if you want a more dense texture, cook the cheesecake for 35 minutes.
Step 7: Let the Cake Cool
When the timer is up, release the pressure in the cooker naturally for about 20-30 minutes. During this time, you can optionally start preparing your ganache (instructions down below) or let your cake cool.
Carefully remove your cheesecake from the instant pot and transfer to a cooling rack and allow to cool for at least an hour. This is very important as the cake may continue cooking with the carryover heat from the instant pot.
After an hour, loosen the outer rim of the cake by running a knife around the edge. Remove the outer edge of the springform pan and transfer your cheesecake to the refrigerator to fully cool and firm for at least 4 hours or overnight.
The following steps are completely optional, so if you're satisfied with your instant pot oreo cheesecake at this point, garnish with chopped Oreos and enjoy! However, if you're feeling a little extra and we hope you are, let's make a white chocolate ganache to pour over your newly created cheesecake.
Step 8: Make the Ganache
Add the white chocolate chips to a large mixing bowl and set aside for now. Pour the heavy cream into a microwave-safe bowl and microwave for 1 minute on high or until it starts to bubble slightly. Once ready, pour the hot cream over the chocolate chips and allow to sit for a minute.
Step 9: Pour the Ganache
Stir the mixture slowly until everything is combined. Your goal here is to melt all the chocolate, however, if you still have some unmelted pieces you can place the mixture back in the microwave for 15-30 seconds and resume stirring.
If your ganache came out too thin, add a bit more white chocolate chips. On the other hand, if it's too thick, try adding a bit more heavy cream.
Once all the chocolate is melted, place your cheesecake on a plate and pour your ganache over the top to completely coat the cake.
Step 10: Garnish!
|
Last but not least, once your cheesecake is adequately coated with the ganache, finish by garnishing with your chopped oreo cookies. Immediately refrigerate the cheesecake for at least 4 hours or overnight, if possible.
Your cheesecake is ready to slice once the chocolate ganache has fully hardened and will keep in the refrigerator for 1 week. However, we doubt it'll last that long!
See how to make your very own instant pod oreo cheesecake in this video by Sweet and Savory Meals Blog:
Instant pot oreo cheesecake, who would've thought? We hope the recipe above piques your interest to further explore the countless capabilities of an instant pot cooker. And if you don't have one yet, hopefully, it sways you to reconsider! Your instant pot cooker can do so much, all it takes is a little practice and experimentation and soon you'll be an instant pot master chef!
What are some of your favorite recipes to make with your instant pot cooker? Did you try the recipe above? Tell us in the comment section below!
Up Next:
- Rainbow No-Bake Cheesecake | Homemade Recipes
- 16 Intensely Delightful Homemade Cheesecake Recipes
- Make A Unique & Delicious Burger COMPLETELY From Scratch
Don’t forget to keep in touch, foodies! You can also WRITE FOR US and share your delectable recipes!
Also, make sure to follow us on Facebook, Instagram, Pinterest, and Twitter!