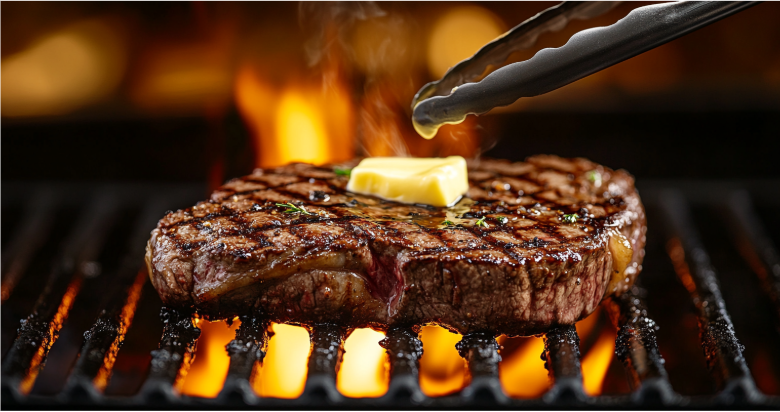
When you cut into a steak that’s just hot off the grill, you expect something more than cooked meat. You’d want a deep brown crust that cracks slightly under the knife and juices that glisten along each slice. A perfect steak should look different before you even cut into it. The surface has a deep, even crust with no pale spots. When you press it with your knife, juice rises slowly to the top. That kind of steak isn’t reserved for chefs or high-end restaurants. You can make one yourself, if you know what to look for and what steps to take. Let’s start with the cut and take it from there.
Grill Mastery: 6 Steps to the Perfect Steak
A perfect steak starts before it ever hits the fire. It begins with a well-marbled cut, a dry surface, and a good coat of coarse salt. When the meat hits a hot grill, you should hear a clean, sharp sizzle. That sound means the surface is searing fast and sealing the juices inside. If you set the stage right, you'll get a perfect steak that has a crisp crust outside and a flavorful meat inside.
Follow these six steps to control the heat, timing, and finishes for a steak that’ll come out just right.
1. Choose the Right Cut 🛒
The steak cut determines how much juice it retains and how strong the flavor turns out. Some cuts are naturally tender, while others need extra care. Fat streaks in ribeye melt on the grill and keep each bite juicy. New York Strip is leaner than ribeye, but it stays tender, with a firm bite and a rich, beefy flavor. Filet Mignon cuts clean with a fork but misses the sizzle and fat-drip crust of other cuts. T-Bone or Porterhouse cuts include both a strip steak and a filet, giving you two textures in one. Sirloin is more affordable and leaner, so it needs careful cooking to stay tender. Whatever you choose, pick steaks that are at least one inch thick. That’s because thicker cuts cook more evenly and retain moisture better.
2. Season the Steak Properly 🧂
Bold flavor comes from salt and heat, not heavy spices. Salt draws out moisture and helps form a crispy crust, bringing out the natural beef flavor. Season 40 minutes early. The salt draws moisture out, then reabsorbs it for deeper flavor. If you didn’t season early, do it just before cooking to avoid drying out the steak. Use coarse salt for better absorption, and if you like extra flavor, add garlic powder or smoked paprika.
3. Get the Grill Hot 🔥
A hot grill sears fast and builds a dark, caramelized crust while sealing in the juices. If you're using a gas grill, turn all burners to high and let it preheat for 10–15 minutes. For a charcoal grill, light the coals and wait until they turn ashy before placing the steak. A properly heated grill prevents the steak from sticking and ensures even cooking.
4. Grill with Precision ⏳
Place the steak on the grill and let it cook without moving it. If you flip the steak too early, the crust won’t form properly. Meanwhile, thicker steaks take longer because heat needs more time to reach the center, so use a meat thermometer to ensure accuracy. For rare (120°F), cook for 2–3 minutes per side, with the center staying cool and red. For medium rare (130°F), cook for 4–5 minutes per side and make the center stay warm and red with a soft texture. For medium (140°F), grill for 6–7 minutes per side to get a slightly pink center with a firm texture. For medium well (150°F), grill for 8–9 minutes per side so the meat is mostly brown with little pink remaining. For well done (160°F+), grill 10 minutes or more per side for a fully cooked steak with no pink remaining. Use direct heat for searing and indirect heat to finish cooking thicker cuts. If flames flare up, shift the steak away from the heat to prevent charring.
5. Let the Steak Rest 🛑
Resting helps the juices stay inside the steak instead of spilling out when you slice it. If you cut the steak too soon, the juices will run out, and the meat will get dry. Let it rest five minutes so the meat cools slightly and the juices stay trapped inside. Rest thick steaks for 10 minutes. Bigger cuts trap more heat and need time to redistribute the juices. Transfer the steak to a clean plate and loosely cover it with foil to keep it warm without trapping steam.
6. Add Finishing Touches 🧈
A seared steak stands alone, but a pat of butter makes every bite richer. Butter melts fast and seeps into the crust. It adds creamy flavor and keeps each bite juicy. Mix softened butter with garlic and herbs, then let it melt over the steak for extra flavor. A final sprinkle of flaky salt adds crunch to the surface and deepens the savory flavor. Apply butter immediately after resting the steak. The warmth of the meat melts it fast and helps the flavor seep in.
What It Takes to Grill a Perfect Steak
The grill isn’t what makes a perfect steak. It’s how you handle the meat while it’s still in your hands. You chose a cut that could hold the heat. You seasoned it with intent. You paid attention when it hit the grate. Every step added up to something worth slicing into.
The next time you stand in front of the grill, will your steak reflect preparation or guesswork?
🔥 FAQs: Perfect Steak Grilling Edition
1. What’s the best oil for grilling steak?
Use a high-smoke-point oil like canola, avocado, or grapeseed oil. Avoid butter or olive oil for high-heat grilling.
2. Should I marinate my steak?
Most high-quality steaks don’t need a marinade. But if you’re using a lean cut, a marinade can help add moisture and flavor.
3. Can I cook steak straight from the fridge?
No! Cold steaks cook unevenly. Let them sit at room temp for 30–45 minutes before grilling.
4. How do I prevent steak from sticking to the grill?
Make sure your grill is clean, hot, and lightly oiled before cooking.
5. How do I get the perfect grill marks?
Place your steak on the grill at a 45-degree angle. After 2 minutes, rotate it 90 degrees to create those beautiful crosshatch marks.