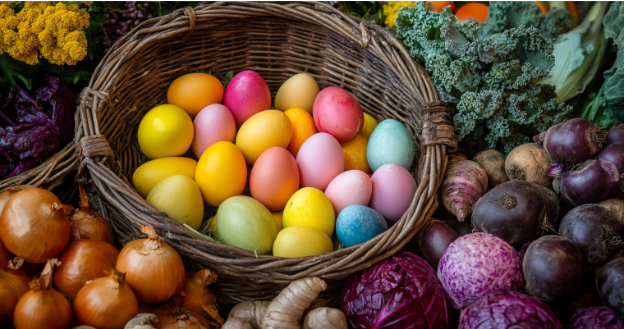
Easter is just around the corner, and you know what that means—it’s time to decorate eggs! Instead of using store-bought kits filled with artificial chemicals, you can create beautiful, vibrant Easter egg dyes using natural ingredients from your kitchen.
Who would’ve thought turmeric, beets, red cabbage, onion skins, and coffee can produce stunning colors? This guide will teach you how to use these ingredients to turn ordinary eggs into Easter eggsterpieces.
Why Choose Natural Dyes?
Using natural ingredients to dye Easter eggs offers several benefits:
- Safety: These dyes are free from harsh chemicals, which make them safe for kids to handle.
- Sustainability: Natural dyes reduce waste and are environmentally friendly.
- Creativity: Each egg has a unique, earthy appearance that adds charm and character.
Additionally, watching colors emerge from everyday foods adds an extra layer of excitement to the process.
Supplies You’ll Need
- White eggs
- White vinegar
- Water
- Pots or bowls
- Spoons or tongs
- Paper towels
- Rubber gloves
Natural Dye Ingredients:
- Turmeric powder for a bright yellow hue 🌟
- Beets for deep pink or reddish tones ❤️
- Red cabbage for blue or purple shades 💙
- Yellow onion skins for a golden-orange color 🍊
- Coffee or tea for earthy brown tones ☕
- Spinach leaves for light green shades 🌿
How to Make Natural Easter Egg Dyes
The dyeing process is simple and fun. Follow these steps for colorful results.
Step 1: Prepare the Eggs
- Start by boiling the eggs. Place them in a pot of cold water, bring it to a boil, and then simmer for 10-12 minutes.
- Once boiled, cool the eggs completely. For brighter colors, gently wipe the eggs with vinegar before dyeing.
Step 2: Create the Dye Baths
Follow these instructions to make your natural Easter egg dyes:
- Prepare the ingredients:
- Chop 2 cups of beets.
- Shred 2 cups of red cabbage.
- Measure 1 tablespoon of turmeric powder.
- Collect 2 cups of onion skins.
- Gather 2 cups of spinach leaves.
- Brew 2 strong cups of coffee or tea.
- Add water: Use about 2 cups of water per ingredient.
- Simmer the mixture: Place the ingredients and water in a pot. Bring to a gentle boil and simmer for 15-30 minutes until the water becomes rich in color.
- Strain the dye: Remove the solid ingredients using a strainer and leave only the colored liquid.
- Add vinegar: Stir in 1 tablespoon of vinegar for every cup of dye to help the color stick to the eggshells.
Step 3: Dye the Eggs
- Place the cooled, hard-boiled eggs in the dye baths.
- For light colors, soak the eggs for 10-20 minutes.
- For deeper, richer shades, let the eggs soak for several hours or overnight in the refrigerator.
🎨 Color Tips and Techniques
- Turmeric (Yellow): Creates a bold, bright yellow color in just 10-15 minutes.
- Beets (Pink/Red): Achieves a lovely pink hue in about 30 minutes. For deeper red tones, soak longer.
- Red Cabbage (Blue/Purple): Although the liquid looks purple, it dyes eggs a beautiful blue. For vibrant blues, soak overnight.
- Onion Skins (Orange): Produces a nice orange shade after soaking for an hour.
- Coffee (Brown): Adds an earthy, vintage look in about 30 minutes.
- Spinach (Green): Gives a subtle green tint after soaking for an hour or more.
Pro Tip:
For unique designs, use rubber bands, wax crayons, or small leaves to create patterns on the eggs before dyeing.
🌟 Creative Design Ideas
Want to add extra flair to your Easter eggs? Try these fun techniques:
- Leaf Prints: Place a small leaf flat against the egg, wrap the egg tightly in a piece of pantyhose and secure it with a rubber band. After dyeing, remove the leaf to reveal its beautiful prints.
- Crackle Effect: Gently crack the shell of a hard-boiled egg without peeling it. Dye the egg as usual. When you peel the shell completely, you’ll discover a cool, marbled effect.
- Wax Resist: Draw designs on the egg with a white crayon before dyeing. The wax will resist the dye and leave your artwork visible.
🥚 Drying and Finishing Touches
After dyeing:
- Carefully remove the eggs using tongs or a spoon.
- Place them on a cooling rack or paper towels to dry completely.
- For a glossy finish, apply a small amount of vegetable oil to the dry eggs and gently rub with a soft cloth.
🪼 Easy Clean-Up Tips
- Cover your workspace with old towels or newspapers to catch any spills.
- Wear an apron or old clothes to avoid staining your clothes.
- If dye stains your hands, scrub with a paste made from baking soda and water.
Dip, Dye, Delight!
Natural egg dyeing is more than just an Easter tradition. It’s an opportunity to connect with loved ones and explore your creativity using natural easter egg dyes. Boil, dip, and decorate—there’s no wrong way to do it. Here’s wishing you a colorful, joyful Easter filled with fun and beautiful memories! 🌸🥚🎨
FAQs About Natural Easter Egg Dyes
- Can I use brown eggs for natural dyeing?
Yes, but the colors will appear darker and more muted than on white eggs. - How long do naturally dyed eggs last?
If kept refrigerated, they last up to one week. - Do I need to refrigerate eggs while dyeing overnight?
Yes, keep eggs in the fridge if soaking overnight to prevent spoilage. - Can I eat the dyed eggs?
Yes, as long as they’ve been properly stored and the dyes are food-safe. - Does vinegar affect the taste of the eggs?
No, vinegar only helps the dye stick to the shell without altering the taste. - How can I make the colors brighter?
Add more dye, use white eggs, and soak them longer for vivid colors. - Can I reuse the dye baths?
Yes, you can reuse them for a few days if kept refrigerated. - What if I don’t have vinegar?
You can use lemon juice as a substitute, though it may be less effective. - Will natural dyes stain my hands?
Yes, some can. Wearing gloves helps prevent stains. - Can I mix natural dyes to create new colors?
Yes, experimenting with dye combinations can produce beautiful, unique shades.